Business Cards
A business card is an excellent way to spread word of your need within your community and beyond Facebook. They're small and easy to carry. Not only can you hand them out to people, you can also leave them in waiting rooms and coffee shops, pin them to public bulletin boards, and mail them to out-of-town friends, asking them to do the same. People are much more likely to remember you if they have some written information and a photo. At the very least, a person may share cards with others who might consider donating. They're relatively inexpensive and easy to make. Here's how:
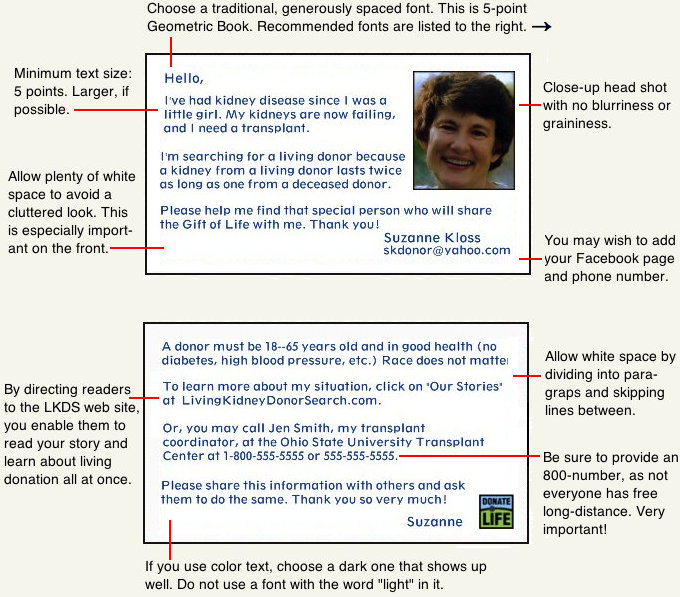
1. Using your elevator speech and the sample cards on this page, write out what you want to include on your business card. The maximum limit for a standard 2" x 3.5" card is about 65 words on the front and 90 on the back. Less is better, when possible.
2. Choose a good headshot photo for the front of the card. (TIP: "Good" means crisp and clear with no blurriness or graininess. Avoid cell-phone photos, as they take notoriously bad pictures.) If you don't have a good headshot, have someone take one. Appearances do matter, and this is your one chance to make a good impression. An attractive photo can make the difference between someone reading your card and tossing it out.
3. Using the sample cards on this page, draw 2 diagrams (front and back), showing where each section of what you've written will be located. Your picture should go on the front. You can put your story and contact information on either side. Any additional information should go on the back. Allow plenty of white space to avoid a cluttered appearance.
4. If you are moderately handy with a computer, go to Zazzle.com to create your card. Of course, you can use any site or print shop of your choice; I just find Zazzle particularly easy to use. The cost is $18.95 for a pack of 100, and you can often find discount codes for Zazzle on Retailmenot.com.
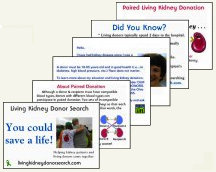
This is a standard 2" x 3.5" card that was made using Zazzle.
5. If you are unable to create a card yourself, ask a computer-savvy friend to help you. If you don't know such a person, be sure you have everything written and diagrammed exactly as you want it. Then use the "Feedback" tab to contact me for help.
This is a 2.5" x 3.5" card that was made using Zazzle.

6. Order a set of cards and make a goal for yourself: How many cards will you distribute each day? It can be as few or as many as you think is practical. The important thing is to set a goal. Without a goal, you will be less likely to hand them out.
7. When your cards arrive, put a stack in your purse, wallet, or pocket and carry them with you everywhere. If you drive, stash some extras in your vehicle.
8. Use every possible opportunity to distribute your cards. Share them every time you give your elevator speech or talk with someone about your need. Always conclude by handing out several cards to each person. Ask them to share the extras with others.
Leave cards everywhere you possibly can, not only in places where they are likely to be seen, but also in odd places. By finding unique places to put your cards, they'll stand out more.
TIP: Find unique places to put your cards--they’ll stand out more. Put them inside magazines at your doctor’s office or leave one behind with your tip at a restaurant. The more off the wall the place, the better.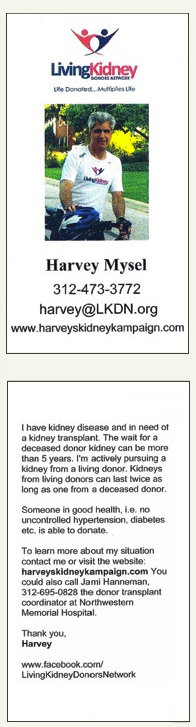 TIP: Make 2” x 3.5” cards. Purchase blank business-card size magnets from an office-supply store and adhere your cards to them. Leave them on street poles and other metal surfaces in public areas.
  TIP: Find stores that have public bulletin boards; grocery stores often have them directly inside the entrance. Use a push pin to put your card up. Then put 15-20 push pins in the shape of an arrow that points directly to your card. It’ll stand out instantly. (Best to supply your own pins.)
  TIP: Leave cards in whatever sits out permanently on restaurant tables, such as condiment racks. Paper clip it to restaurant advertising cards that sits on the table. Try paper-clipping some to the inside of a menu. Leave one under a cup for whomever clears the table.
TIP: Leave cards inside books and magazines at the library. Choose popular ones that are likely to be looked at or checked out.
TIP: People love to see the word “FREE.” Put a small sign that says “FREE” next to a stack of cards. People’s eyes will gravitate toward them.
Other Places: 
